Process Optimization
The Missing Measurements of Deburring
By LaRoux Gillespie, deburring expert and this month’s guest writer
Comco’s latest micro-lesson, Edge-Rounding on Nitinol Implants, reminded me of one of the factors often missed in deburring improvement. Their case study did a good job of showing the measurements and edge conditions on a part before and after it was blasted with several different types of media. It reminded me of a challenge that I faced while reducing part rejection in my deburring days.
When Part Rejection becomes overwhelming
I spent much of my life as a manufacturing engineer on precision miniature parts. Tolerances were often as low as +/- 50 millionths of an inch (or 1.27 microns). I even worked on a part so small that over 200,000 pieces could fit into a thimble. Most parts were stainless steel, and our shop made 350 different parts of all geometries for a single program. Then, a new program would come along and another 200-300 parts of every imaginable configuration would be in production. You get the idea.
Burrs became very important to me when the shop superintendent came in and said, “LaRoux, we are rejecting 50,000 of these critical precision parts a month for burrs.” Over a few years, I documented what deburring methods worked and what didn’t by taking countless measurements of burr conditions on the parts we produced. Time and again, one measurement proved to be the most important to effective burr removal.
Traditional Practices
Most companies set a measurement goal, controlling the edge radii or condition after the burrs, flash, or recast material have been removed; but they often fail to measure the starting point.
As a result, many seemingly solved problems pop-up again, which means production has to stop and engineers have to go back to the beginning to determine if these problems are due to the machining process or the deburring method.
Start at the beginning
If you want to determine the most efficient and effective way to remove a burr, you have to know its size.
Companies usually measure hardness, surface finish, machining time, feed-rates, speeds, etc. and only use these measurements to assess edge conditions after the deburring process. Understanding the burr itself is just as important. In my work, we learned to tie the finished deburring results back against the burr size. If over time the deburring results changed, our first step was to measure the burr and see if it was a different size, and it always was.

What Burr Measurements are important?
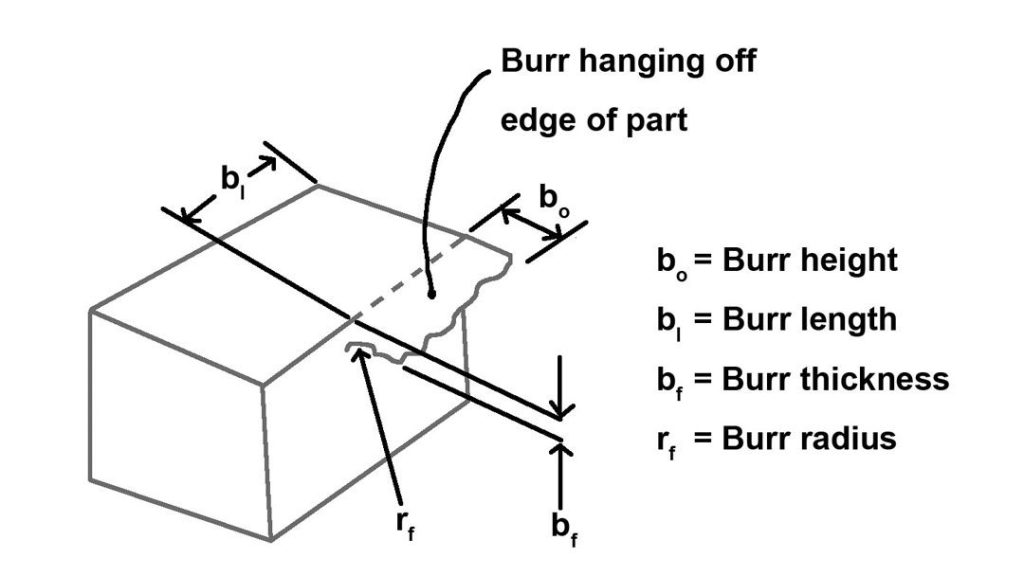
Measure the thickness of the burr at its base to determine the most effective deburring method.
For instance, if a burr is only 50 millionths of an inch thick, I can just blow it off with my breath. That is a small exaggeration, but it makes the point. If a burr is that small, just a second or two MicroBlasting should remove it cleanly. Height rarely matters in burr removal, unless the burr is so long that it bends over and shields the root from the deburring method. Cutting tools and the base material can cause a natural variation in burr thickness.
For heavier burrs, measure the thickness at several locations and calculate an average thickness.
4 Conventional ways to measure burr properties
- Just look down on the burr with a measuring microscope. This can provide measurements, but this approach alone is not as consistently accurate as the approaches outlined below, in part because burrs often bend over and hide the root, making it difficult to determine where the root ends.
- Pot the part into a metallurgical mount, cut it in half, and polish the surface. Then, measure the mounted edge under a measuring microscope.
- Pour a room-temperature-vulcanizing (RTV) silicone compound over the edge, let it cure, pull it off, then slice the RTV mold with a razor blade to make a thin section. Then, measure the burr image in the molded RTV using a measuring microscope.
- Measure the edge condition with a sophisticated laser, light section, or even CMM equipment.
The third approach (RTV) is the cheapest and quickest and only a little less accurate than the second (mount) approach. The fourth approach requires some expensive equipment and because of part geometry, this approach is often not optimal.
A Great Resource
If you want a more robust explanation, the SME resource, Deburring and Edge Finishing Handbook, describes how to take measurements, test for effectiveness, prevent burrs, and minimize burr formations. It also compares the major deburring processes available.
Knowing burr size speeds everything up
Size really helps determine which of the 124 deburring methods out there are the fastest, safest, and least expensive for your particular application. If you can provide the size of the burr, flash, or the recast in actual measurements; deburring providers can usually give you quick insight into how their technology may or may not be most effective.
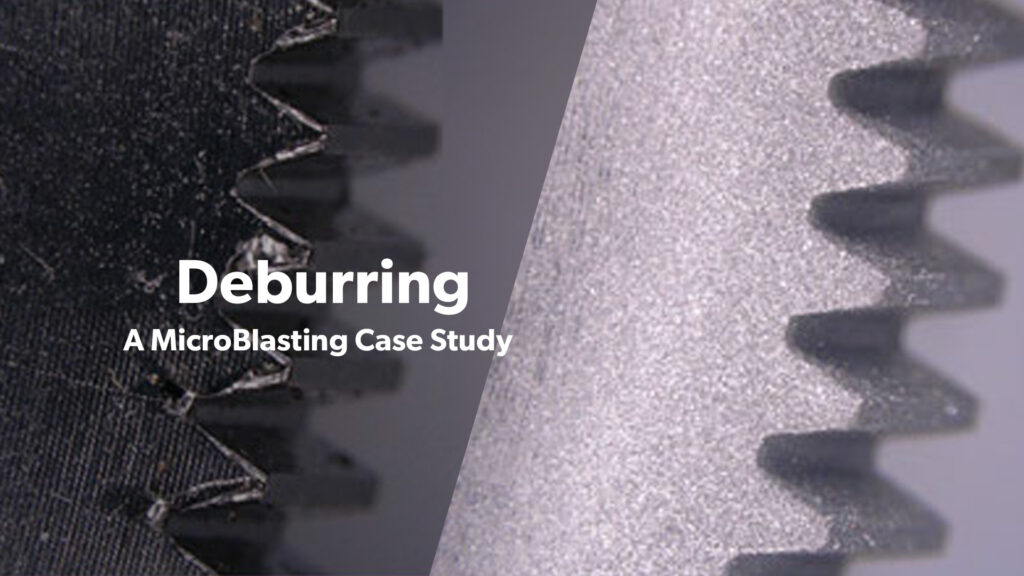
For example, MicroBlasting cannot remove really thick burrs. Some deburring methods like tumbling or electrochemical deburring can, but these processes usually impact part dimensions. A thin burr, however, tends to have a brittle root, and a micro-abrasive stream can selectively target this type of burr without altering the underlying or surrounding surface.
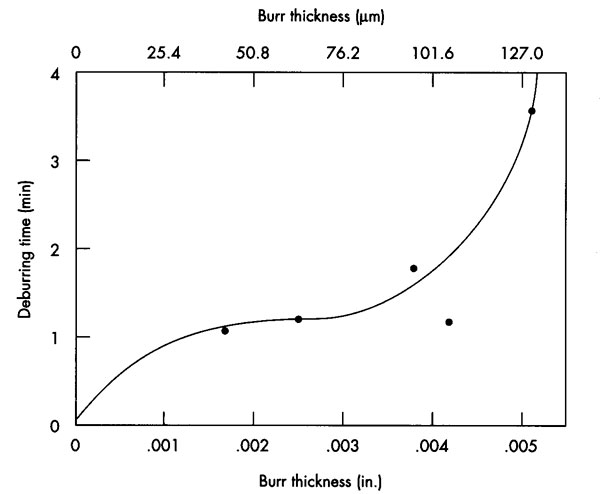
Now, if burrs are more than 0.003” thick, time is better spent improving the machining process rather than finding a deburring method.
Vary the process, but don’t get rid of it
Comco’s micro-lesson on edge-rounding reminded me of another point pertinent to my deburring days: vary the process. On occasion, we use a deburring method that initially provides great results, but begins to fail as the burr size changes or the needs of the application shift.
Instead of opting for a completely different deburring approach to accommodate changes in the finished part specification; consider modifying your existing process.
For example, if the burr size changes, you could simply use a different abrasive or add a second abrasive. In Comco’s edge-rounding case study, aluminum oxide provided the aggressive deburring required for that specific application, but it left a matte finish. Adding a quick blast of glass bead as a secondary step restored the part surface to the desired satin finish.
The research is available!
Deburring, deflashing, and removing recast material on precision parts is really an exciting field for those who want to solve problems. It is also a field for which many of the solutions are known and have been documented for decades in published research and numerous books in multiple languages. If burrs are an issue, read the research, and spend time with the many existing equipment vendors in manufacturing. And when you do, ask them about the burrs they measure.


LaRoux Gillespie
Dr. Eng, FSME, CMfgE, PE, CEng – Researcher, Engineer, Manager, Consultant, Writer
LaRoux K. Gillespie is a consultant and writer on manufacturing issues. A retired Manager in Honeywell’s Kansas City Division, he has written or edited technical books, training materials and articles on precision machining and deburring, as well as on professional development for engineers and engineering students. Much of his professional work has concentrated on machining, burr formation and deburring processes some translated into Japanese, German, Chinese and Korean. LaRoux has been a key leader in organizing international technical efforts on technology such as the World-Wide Burr Technology Committee, an international team devoted to technology for the edge finishing industry. A Fellow of the Society of Manufacturing Engineers (SME), LaRoux has served in local, regional and national positions, and is a frequent speaker on burrs, young engineers, motivation, and the future of manufacturing engineering.
